This article guides you through building a Spring Boot demo application and deploying it on Kubernetes using the JBoss Web Server Operator. The application uses the TodoMVC Angular front-end, integrated with a Spring Boot backend. The Todo entity is defined with JPA annotations for database mapping. The TodoController handles CRUD operations, and TodoRepository extends JpaRepository for database interactions. The application can be run locally or packaged with Tomcat as an embedded server. The deployment process includes building a Docker image, pushing it to a repository, and deploying on OpenShift. Configuration details for both H2 and PostgreSQL databases are provided.
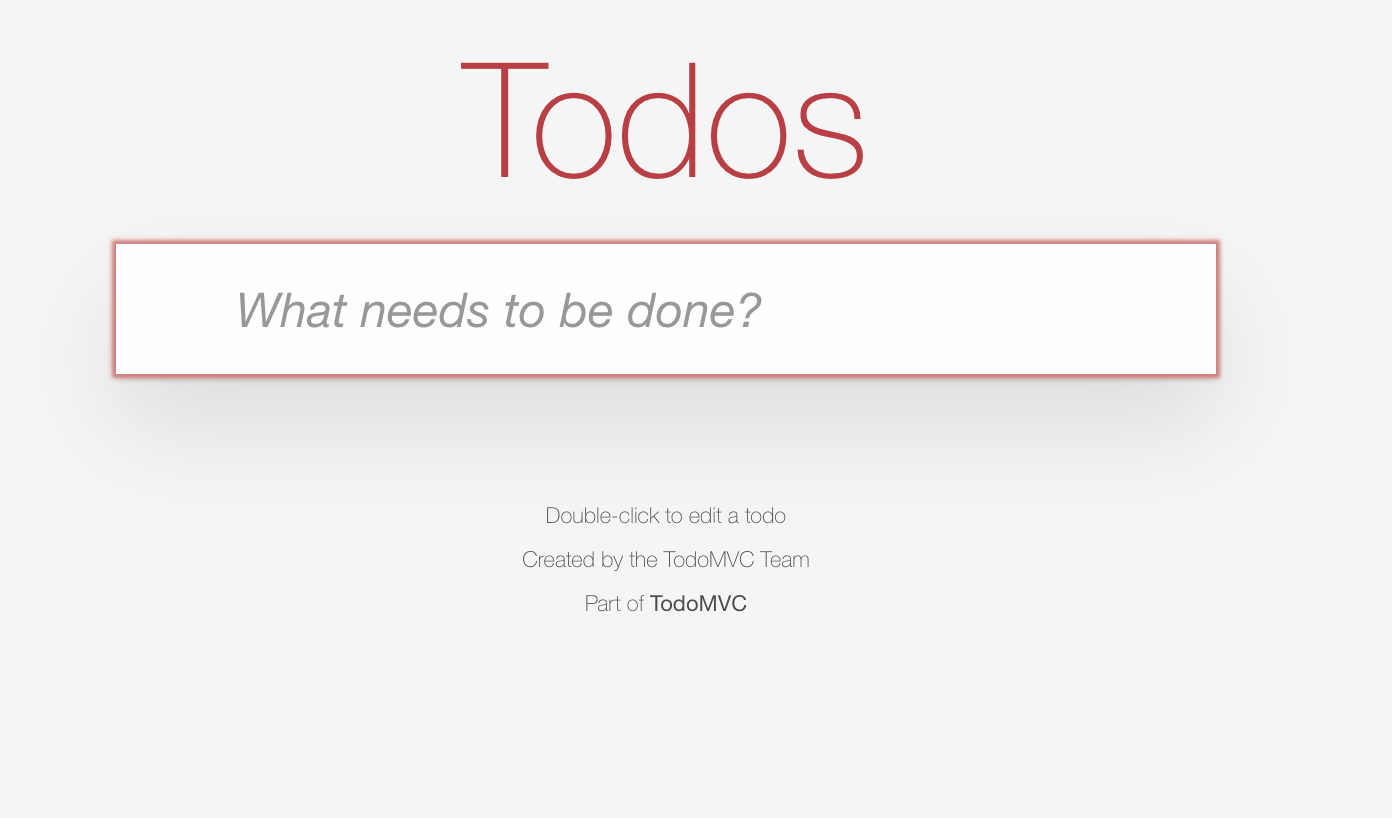
For our application we use the Todo MVC angular application.TodoMVC is a project that provides the same “Todo” application implemented using various popular JavaScript frameworks. The goal of TodoMVC is to help developers compare and contrast the different frameworks and libraries by showing how they each solve the same problem with the same functionality. In this demo app we use Todo MVC frontend Angular example. The project was built and then copied into the Java project/resources directory to keep in the same application and in the root context.
The backend is implemented in Spring Boot, which is a framework designed to simplify the development of stand-alone, production-grade Spring-based applications. It builds on the Spring Framework by providing pre-configured templates and a convention-over-configuration approach, making it easier to set up and deploy applications with minimal configuration.
This project uses Spring Boot framework and the Spring Boot Tomcat Starter. Which is a dependency that you can include in your Spring Boot project to run your application with an embedded Apache Tomcat server. This allows you to package the application as a self-contained executable JAR file including Tomcat, making it easy to deploy and run your application without needing to configure an external web server.
The complete source for the application is available here
Todo Entity
First we create an entity called Todo. This is how we want to store data into our backend database. Todo represents an entity for a “to-do” item in a database. The class uses Jakarta Persistence (formerly Java Persistence API or JPA) annotations to map the class to a database table.
@Entity
@Table(name = "todos")
public class Todo {

    // Specifies that the primary key is generated automatically by the database (auto-incremented).
    @Id
    @GeneratedValue(strategy = GenerationType.IDENTITY)
    private Long id;

    // Ensures that the title field is not blank (cannot be null or empty). and is unique
    @NotBlank
    @Column(unique = true)
    private String title;

    private boolean completed;

    // Maps the field to a column named "ordering" in the database.
    @Column(name = "ordering")
    private int order;

    @Column(name = "url")
    private String url;

    // Getters and Setters
    ....
}
TODO Controller
The TodoController, which handles HTTP requests related to “Todo” items. It utilizes several Spring components and annotations to define endpoints for CRUD (Create, Read, Update, Delete) operations.
The Controller defines the following constructs:
@RestController: Marks this class as a Spring MVC controller where every method returns a domain object instead of a view. It combines @Controller and @ResponseBody.@CrossOrigin: Enables Cross-Origin Resource Sharing (CORS) for the entire controller, allowing requests from different origins.@RequestMapping("/api/todos"): Maps HTTP requests to /api/todos to this controller.
@RestController
@CrossOrigin
@RequestMapping("/api/todos")
public class TodoController {

    @Autowired
    private TodoService todoService;
Getting all Todos
Maps HTTP GET requests to this method. It returns a list of all to-do items by calling todoService.getAllTodos().
    @GetMapping
    public List<Todo> getAllTodos() {
        return todoService.getAllTodos();
    }
Getting a Todo by Id
@GetMapping("/{id}"): Maps HTTP GET requests with a path variable id to this method. It retrieves a to-do item by its ID.@PathVariable Long id: Binds the id path variable to the method parameter.ResponseEntity: Wraps the response with appropriate HTTP status codes. Returns 200 OK if the to-do item is found, otherwise 404 Not Found.
    @GetMapping("/{id}")
    public ResponseEntity<Todo> getTodoById(@PathVariable Long id) {
        Optional<Todo> todo = todoService.getTodoById(id);
        return todo.map(ResponseEntity::ok).orElseGet(() -> ResponseEntity.notFound().build());
    }
Create a Todo
To create a Todo we expect a request with JSON from the front-end.
@Transactional: Ensures that the method is executed within a transaction.@PostMapping: Maps HTTP POST requests to this method. It creates a new to-do item.@RequestBody Todo todo: Binds the request body to the method parameter todo.
    @Transactional
    @PostMapping
    public Todo createTodo(@RequestBody Todo todo) {
        return todoService.createOrUpdateTodo(todo);
    }
Update a Todo
@PutMapping("/{id}"): Maps HTTP PUT requests with a path variable id to this method. It updates an existing to-do item.@RequestBody Todo todoDetails: Binds the request body to the method parameter todoDetails.ResponseEntity: Returns 200 OK if the update is successful, otherwise 404 Not Found.
    @Transactional
    @PutMapping("/{id}")
    public ResponseEntity<Todo> updateTodo(@PathVariable Long id, @RequestBody Todo todoDetails) {
        Optional<Todo> todo = todoService.getTodoById(id);
        if (todo.isPresent()) {
            Todo todoToUpdate = todo.get();
            todoToUpdate.setTitle(todoDetails.getTitle());
            todoToUpdate.setCompleted(todoDetails.isCompleted());
            todoToUpdate.setOrder(todoDetails.getOrder());
            todoToUpdate.setUrl(todoDetails.getUrl());
            return ResponseEntity.ok(todoService.createOrUpdateTodo(todoToUpdate));
        } else {
            return ResponseEntity.notFound().build();
        }
    }
Delete a Todo
@DeleteMapping("/{id}"): Maps HTTP DELETE requests with a path variable id to this method. It deletes a to-do item by its ID.ResponseEntity<Void>: Returns 204 No Content if the deletion is successful.
    @Transactional
    @DeleteMapping("/{id}")
    public ResponseEntity<Void> deleteTodoById(@PathVariable Long id) {
        todoService.deleteTodoById(id);
        return ResponseEntity.noContent().build();
    }
}
Todo repository
By extending JpaRepository, TodoRepository inherits several methods for performing common database operations without the need to define them explicitly:
save(S entity): Saves a given entity.
findById(ID id): Retrieves an entity by its ID.
findAll(): Retrieves all entities.
deleteById(ID id): Deletes an entity by its ID.
deleteAll(): Deletes all entities.
The @Repository annotation indicates that the interface is a Spring Data repository.
package org.acme.todo.repository;


import org.acme.todo.model.Todo;
import org.springframework.data.jpa.repository.JpaRepository;
import org.springframework.stereotype.Repository;

@Repository
public interface TodoRepository extends JpaRepository<Todo, Long> {
}
Run the app locally
Finally we define the database configuration. To run the backend database or you can uncommnent the H2 database settings in application.properties. (make sure to comment out the PG props in that case)
## default connection pool
spring.datasource.hikari.connectionTimeout=20000
spring.datasource.hikari.maximumPoolSize=5

# H2
#spring.datasource.url=jdbc:h2:mem:testdb
#spring.datasource.driverClassName=org.h2.Driver
#spring.datasource.username=sa
#spring.datasource.password=password
#spring.h2.console.enabled=true
#spring.jpa.database-platform=org.hibernate.dialect.H2Dialect
#spring.jpa.hibernate.ddl-auto=update

## PostgreSQL
spring.datasource.url=jdbc:postgresql://todos-database:5432/todos
spring.datasource.username=jws
spring.datasource.password=jws
spring.jpa.database-platform=org.hibernate.dialect.PostgreSQLDialect
spring.jpa.hibernate.ddl-auto=update
spring.jpa.show-sql=true
To start the PG database for the backend I am using podman (a container runtime)
podman run --name todos-database -p 5432:5432 -e POSTGRES_USER=jws -e POSTGRES_PASSWORD=jws -e POSTGRES_DB=todos -d postgres:15-alpine Running the app from source.
The command mvn spring-boot:run is used to run a Spring Boot application using Apache Maven.
the mvn spring-boot:run command is a convenient way to start a Spring Boot application directly from the command line without having to package it first into a JAR or WAR file. It is commonly used during the development phase to quickly test and iterate on the application
mvn spring-boot:runBuilding the image and pushing it to a repo
First we need to build and package the source files
mvn clean compile packageThe command is composed of three separate phases of the Maven build lifecycle: clean, compile, and package. As the goals state once the command completes it should copy the WAR file into the target directory. Ready to be deployed into JBoss Web Server (JWS)
The JWS Operator can use a pre-built image or it can derive one from source code. In this example we create an image and push it to quay.io
First a little about the Dockerfile
FROM registry.redhat.io/jboss-webserver-6/jws60-openjdk17-openshift-rhel8:6.0.2-2

COPY target/todo-demo-jws-0.0.1-SNAPSHOT.war /deployments/ROOT.war- We use the JBoss Web Server 6 image. The images uses OpenJDK version 17
- We also copy our war file to the root. so it resolves on
/
Run the following command to build the image.
podman build --arch=x86_64 -t YOUR_REPO_NAME:latest .podman build: This is the primary command to build a container image using Podman. It is similar to docker build in Docker.
–arch=x86_64: This specifies the architecture for the container image. x86_64 indicates that the image should be built for the 64-bit x86 architecture. This is useful when you are building images for different architectures and need to specify the target architecture explicitly. This is useful e.g. if you are running the build on Apple Silicon like the M series.
-t quay.io/sshaaf/todo-demo-jws:latest: e.g. -t for the tag and rest is the repo name/image
Once built push the image to a repository accessible by the OpenShift cluster. Quay.io or the DockerHub are both accessible by an OpenShift cluster as they are publicly hosted.
Running the app on OpenShift using Operator
First things first we need to deploy a database before we deploy the application
Database
The following command creates a new PostgreSQL database application in OpenShift using the latest PostgreSQL image. It sets up the database with the username jws, the password jws, and the database name todos. The application is named todos-database.
oc new-app -e POSTGRESQL_USER=jws \                                                                                                                                                             (base)
            -e POSTGRESQL_PASSWORD=jws \
            -e POSTGRESQL_DATABASE=todos \
            openshift/postgresql:latest \
--name=todos-database- oc new-app: This is the primary command used to create a new application in OpenShift. It helps to instantiate new applications from source code, templates, or Docker images.
- -e POSTGRESQL_USER=jws: This flag sets an environment variable POSTGRESQL_USER with the value jws. In this context, it’s used to specify the username for the PostgreSQL database.
- -e POSTGRESQL_PASSWORD=jws: Similar to the previous flag, this sets another environment variable POSTGRESQL_PASSWORD with the value jws. This is the password for the PostgreSQL user.
- -e POSTGRESQL_DATABASE=todos: This sets the environment variable POSTGRESQL_DATABASE with the value todos, which specifies the name of the PostgreSQL database to be created.
- openshift/postgresql:latest: This part specifies the Docker image to use for the new application. openshift/postgresql:latest indicates that the latest version of the PostgreSQL image from OpenShift’s repository should be used.
- –name=todos-database: This option assigns a name to the new application being created. In this case, the application will be named todos-database.
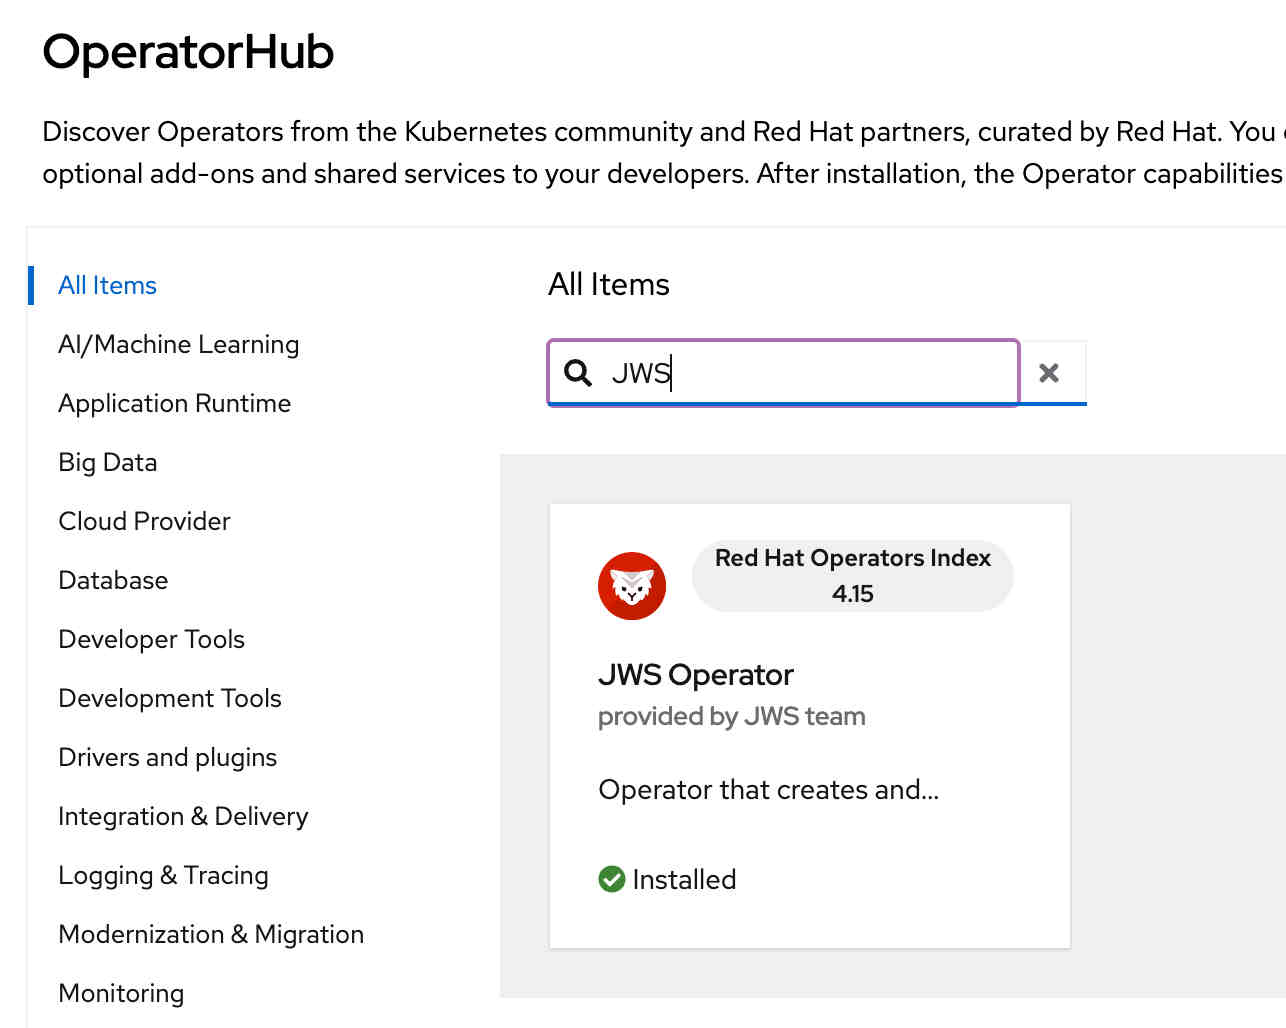
The Operator
There are multiple ways to install the operator. The Operator is searchable and installable in the OpenShift Console via the OperatorHub
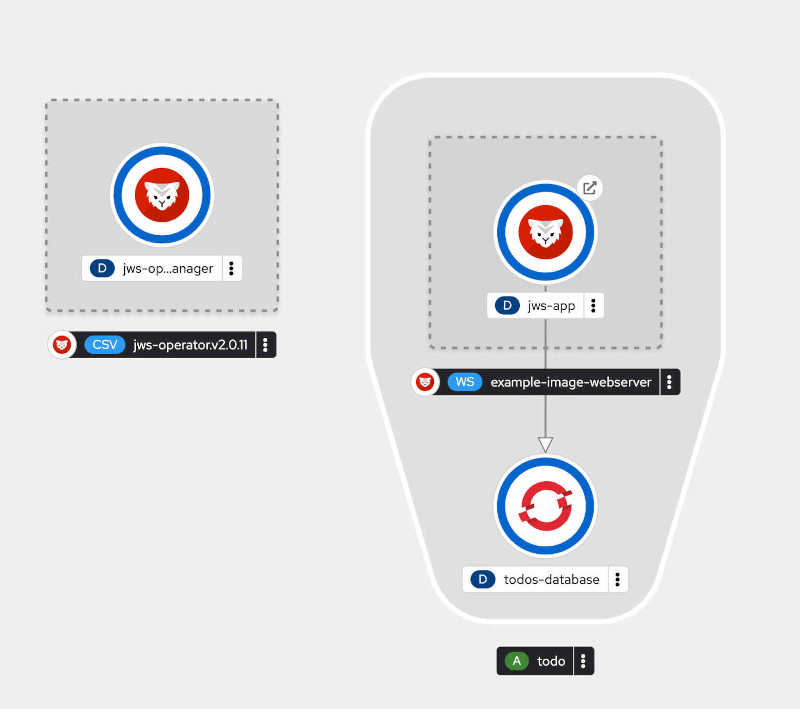
Creating a new Webserver instance
Once the Operator is installed. The app can be installed with the following CR.
apiVersion: web.servers.org/v1alpha1
kind: WebServer
metadata:
  name: todo-demo-app
  namespace: test
spec:
  webImage:
    applicationImage: 'quay.io/sshaaf/todo-demo-jws'
  applicationName: jws-app
  replicas: 2
apiVersion: web.servers.org/v1alpha1: This specifies the API version of the resource. In this case, it’s web.servers.org/v1alpha1, indicating that this resource is part of a custom API group web.servers.org and is at version v1alpha1.
kind: WebServer: This defines the kind of resource being described. Here, it is a WebServer. This is a custom resource that is likely defined by a CRD in the Kubernetes cluster.
metadata: This section contains metadata about the resource.
- name: todo-demo-app: This sets the name of the resource to
todo-demo-app. - namespace: testThis specifies that the resource will be created in the
testnamespace.
spec:: This section defines the desired state of the resource.
- webImage:: This nested section likely pertains to the image settings for the web server.
- applicationImage: ‘quay.io/sshaaf/todo-demo-jws’: This specifies the Docker image to use for the application. It points to
quay.io/sshaaf/todo-demo-jws, which is a hosted image repository (Quay.io). - applicationName: jws-app: This sets the name of the application to
jws-app. - replicas: 2: This specifies the desired number of replicas (instances) of the application to run. In this case, 2 replicas are requested.
Run the following command to get the route of the deployed application
oc get routes                                                                                                                                                                                   (base)

NAME      HOST/PORT                            PATH   SERVICES   PORT    TERMINATION   WILDCARD
jws-app   jws-app-xx.apps.red.demoshift.com          jws-app    <all>                 None
You can now use your awesome TODO app running on JWS using Spring boot 3 and AngularJS.
More configuration to play with
- replicas:: This specifies the desired number of replicas (instances) of the application to run.
- useSessionClustering: true: Enables DNSping session clustering
- deploying via Webhooks: JWS docs