The Keycloak team announced that they were going to move to a new Operator framework that will effictevely manage Keycloak installatons on a Kubernetes cluster. So what is an Operator in the Kubernetes context. Simplyfying it a bit here… Its basically a component that takes over the operational aspects of your application. So rather then managing all of the lifecycle and state in scripts and in our minds in someways is coded into an operator. For us Keycloak Operator does exactly that and in this blog I will cover how to setup a very simple Keycloak installation and get ready for development. If you are interested in knowing more about Operators you will likely find some good info here.
If you arent familiar with Keycloak; its an opensource identity and access management software. Current version is 22, its used alot already in the wild. It provides single sign on capabitlity with OAuth/OIDC, AD, LDAP and SAML v2 as well. If you aren’t very familiar with Keycloak, I have also written a small self-paced Keycloak tutorial that goes through all the basics and some advance configs too.
Let’s get cracking on installing a basic keycloak instance backed by a PostgreSQL database.
So heres the plan
- Install Operator on OpenShift cluster (a distribution of Kubernetes by Red Hat)
- Install database for the Keycloak backend.
- Create SSL certificate for use with keycloak backend.
- Install the first Keycloak instance.
- Importing a realm
Installing the Operator
To install the Keycloak operator I am choosing to install it via the webconsole which is an easy way to do it. Its also possible to do it via CLI.
Simply search for keycloak and press install. e.g.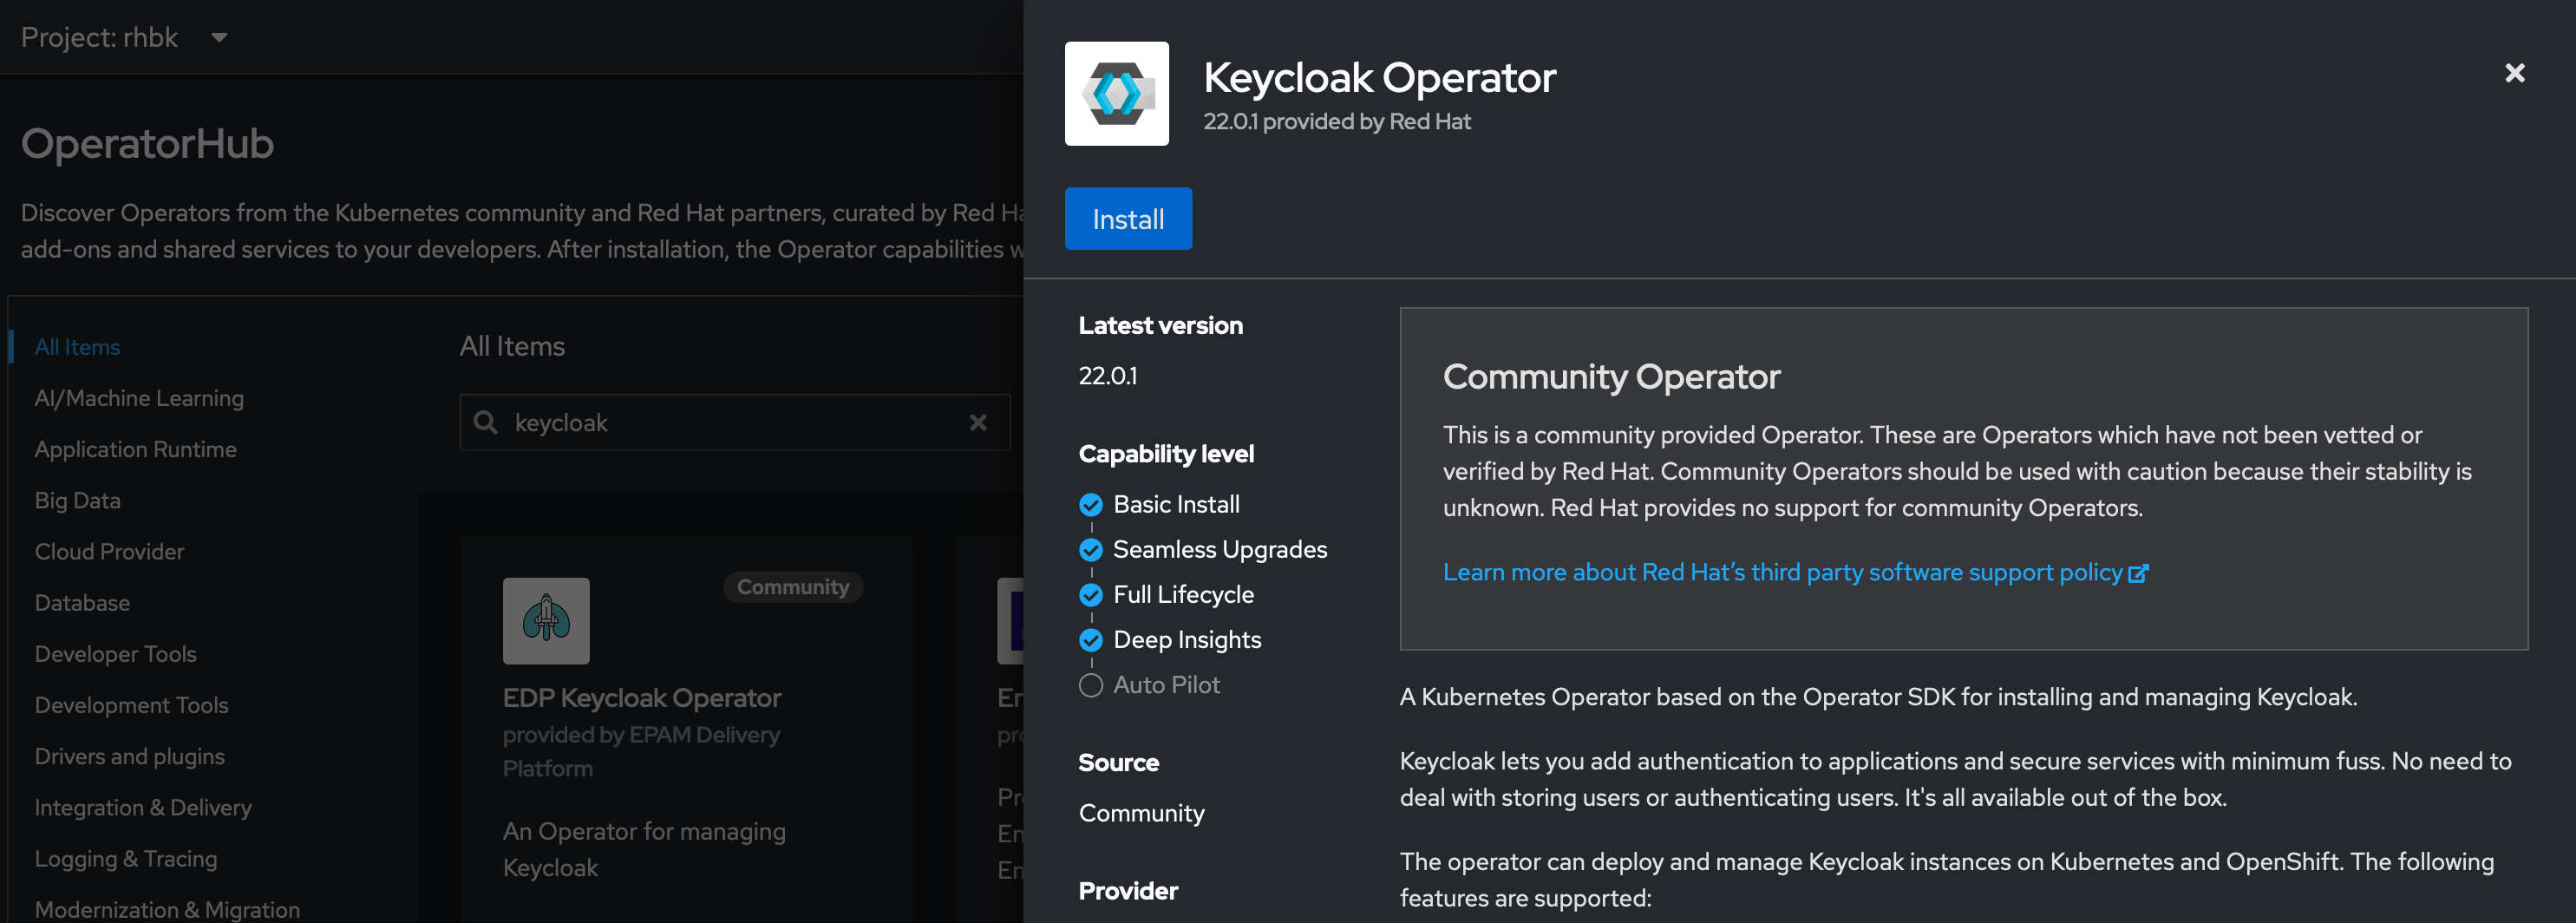
Once you press install the installer will ask which namespace you would like to install to. In my case it the rhbk.
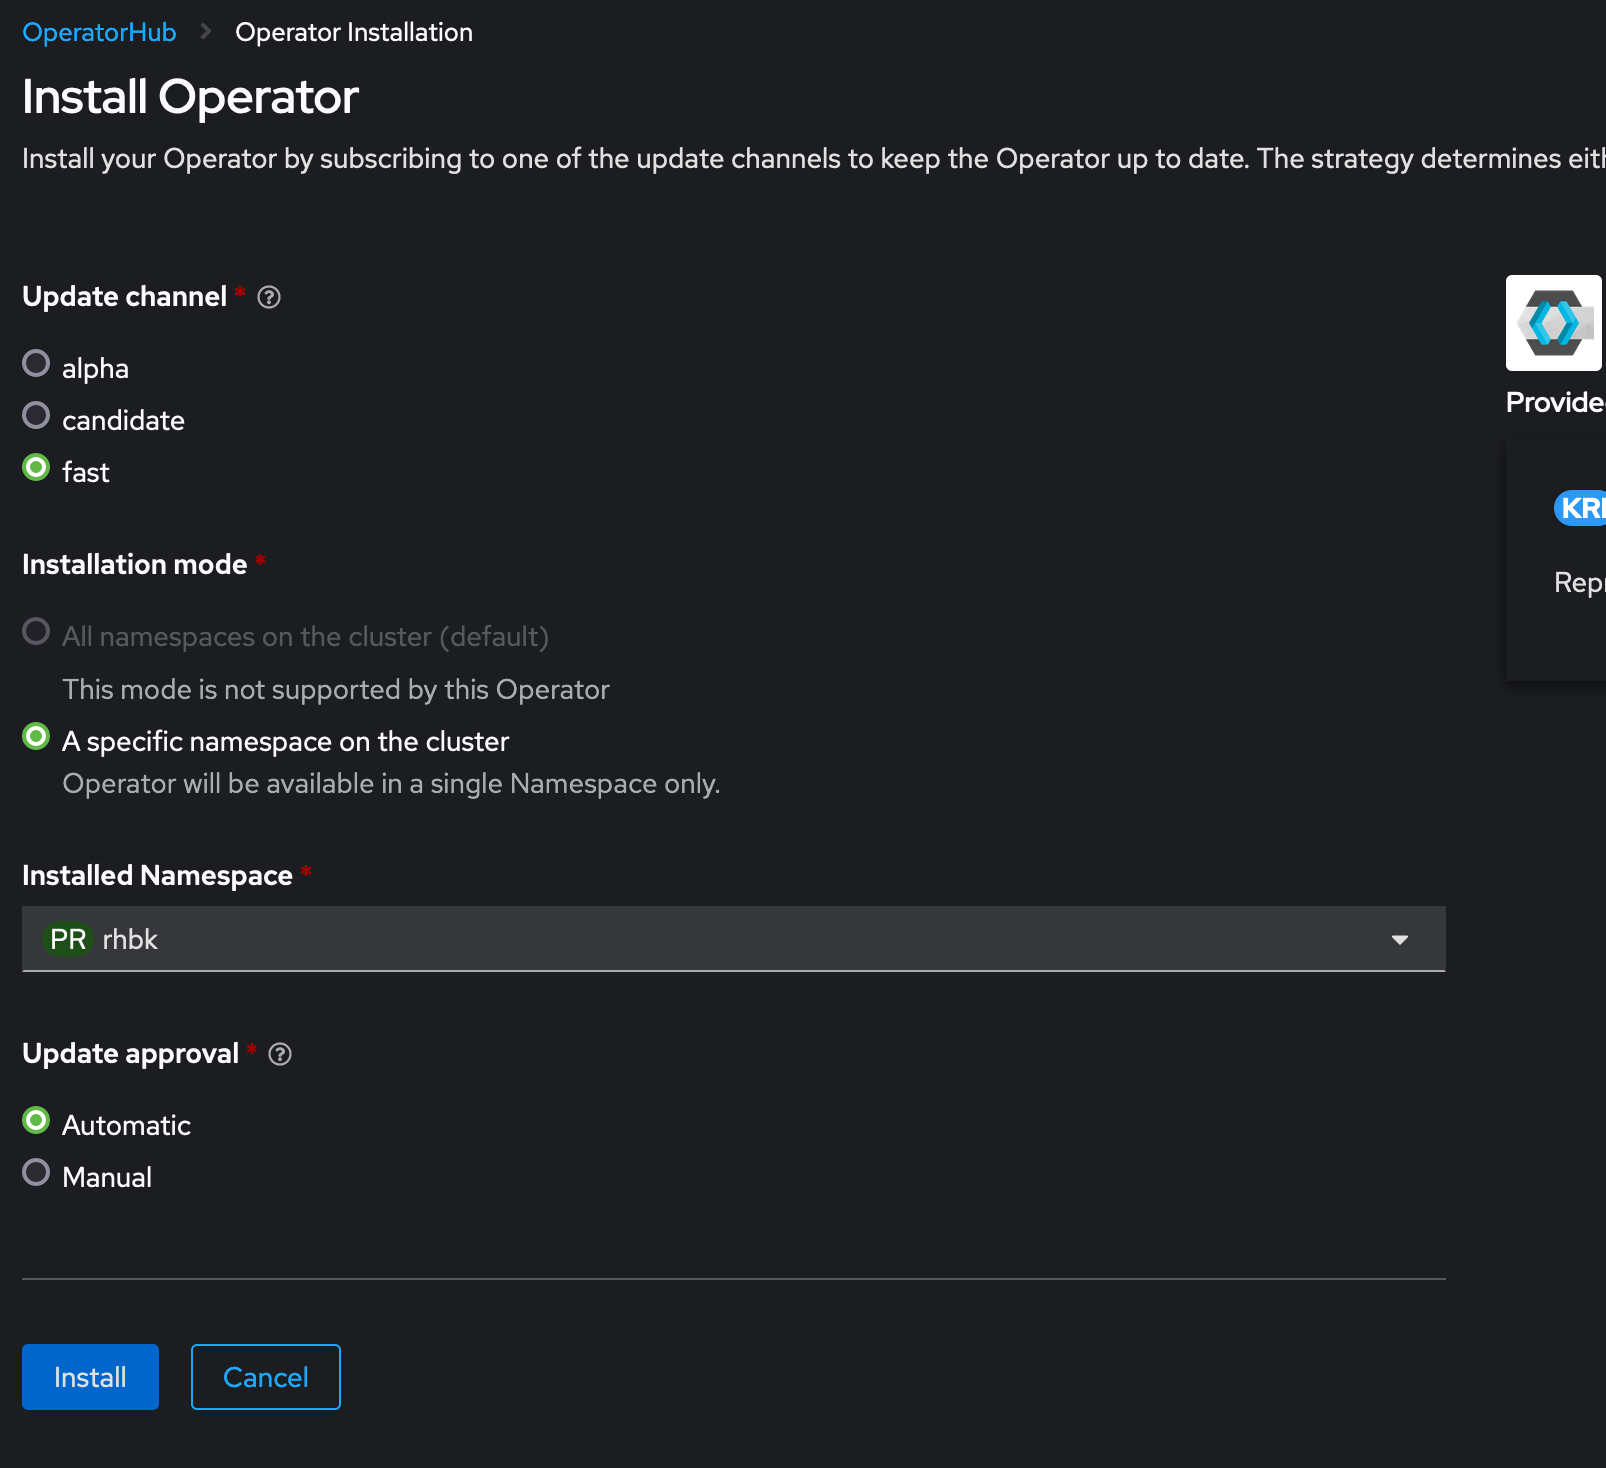
This could take a couple of seconds or minutes depending on your cluster.
Installing the database
For the Keycloak server to store its state and data it should have a database. For this I will use Crunchy.
apiVersion: apps/v1
kind: StatefulSet
metadata:
  name: postgresql-db
spec:
  serviceName: postgresql-db-service
  selector:
    matchLabels:
      app: postgresql-db
  replicas: 1
  template:
    metadata:
      labels:
        app: postgresql-db
    spec:
      containers:
        - name: postgresql-db
          image: postgres:latest
          volumeMounts:
            - mountPath: /data
              name: cache-volume
          env:
            - name: POSTGRES_PASSWORD
              value: testpassword
            - name: PGDATA
              value: /data/pgdata
            - name: POSTGRES_DB
              value: keycloak
      volumes:
        - name: cache-volume
          emptyDir: {}
---
apiVersion: v1
kind: Service
metadata:
  name: postgres-db
spec:
  selector:
    app: postgresql-db
  type: LoadBalancer
  ports:
  - port: 5432
    targetPort: 5432
Create SSL certificate for use with keycloak backend.
Okay time to create a self-signed certificate, incase it was production assuming that would be via a certificate autority instead. But here since I am just testing this out we an just use the self-signed certificate. On a linux machine I can create a self-signed certificate like this where keycloak.rhbk.apps.green.demoshift.com is the address to my keyclaok instance and O is Test demoshift. it could be anything you want to denote here in my case its a test Org.
openssl req -subj '/CN=keycloak.rhbk.apps.green.demoshift.com/O=Test demoshift./C=US' -newkey rsa:2048 -nodes -keyout key.pem -x509 -days 365 -out certificate.pem

Generating a 2048 bit RSA private key
.....................+++++
.....................+++++
writing new private key to 'key.pem'
Lets load this certificate into our Kubernetes environment by usng the following command. Make sure the path for the cert is correct, in my case I am in the same dir as my cert.
kubectl create secret tls example-tls-secret --cert certificate.pem --key key.pem Also a good practise is to load the database password as a secret rather then it littering around different yaml files.
kubectl create secret generic keycloak-db-secret \
            --from-literal=username=postgres \
            --from-literal=password=testpassword
Install the first Keycloak instance
apiVersion: k8s.keycloak.org/v2alpha1
kind: Keycloak
metadata:
name: example-kc
spec:
instances: 1
db:
vendor: postgres
host: postgres-db
usernameSecret:
name: keycloak-db-secret
key: username
passwordSecret:
name: keycloak-db-secret
key: password
http:
tlsSecret: example-tls-secret
hostname:
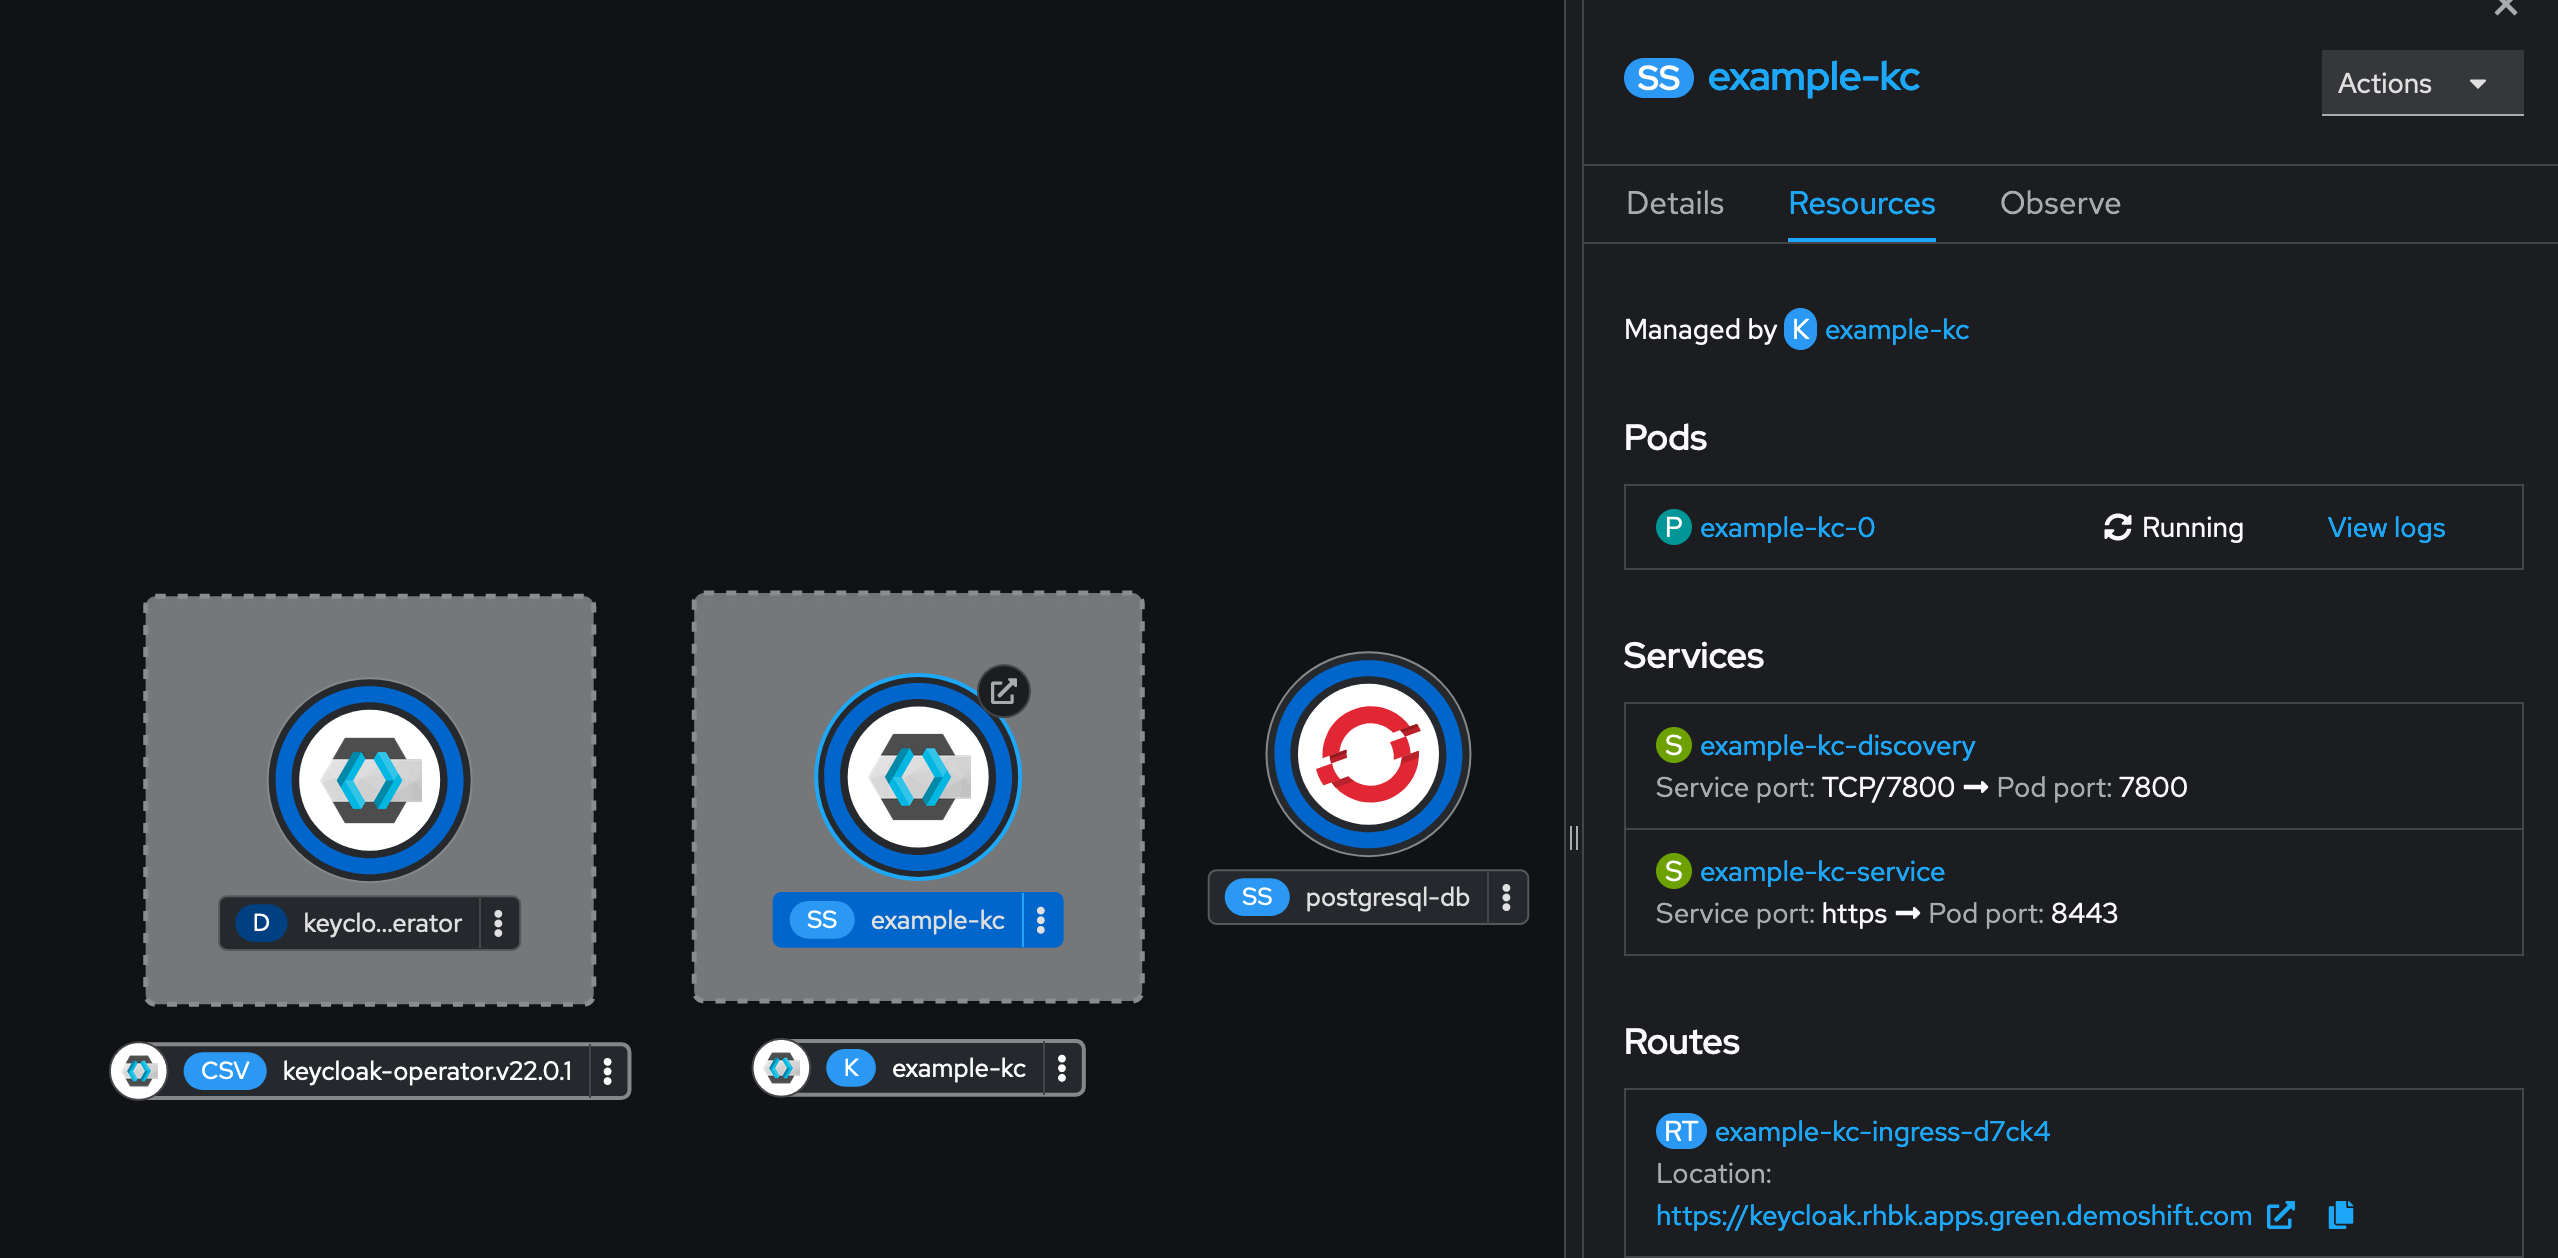
hostname: keycloak.rhbk.apps.green.demoshift.comNow if we go back to the webconsole you should be able to see.
- Keycloak operator pod
- PG database pod
- Keycloak server pod.
OpenShift has this nice feature that you can see the route once you click your application. also visible in the image below. Head over to your instance and login.
To login obviously one needs the admin password which in this case has been autogenerated by the operator. Lets get that by running the following command.
kubectl get secret example-kc-initial-admin -o jsonpath='{.data.password}' | base64 --decodeAssuming we have the password, lets go back to the route and click on Adminstration console. Username is admin and password should be what we retrieved from the command above.
Login and Viola! we have landed on our freshly installed Keycloak server.
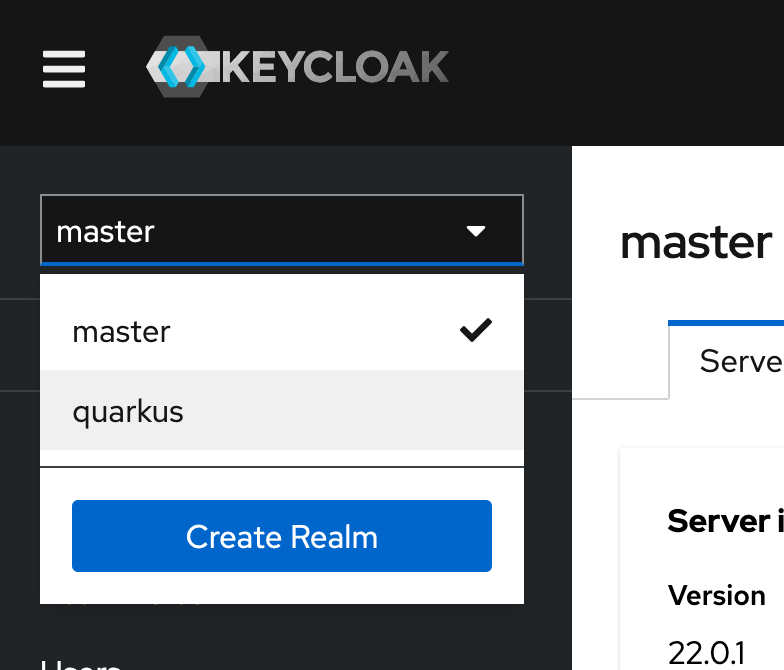
Importing a realm
At this moment we only have the master realm. Typically one should leave the master realm intact without much changes. The logic behind that would be not to lock ourselves out. How about we import a realm. And here the power of Operator comes into play. We will create a RealmImportCR and that will add a new realm to Keycloak. Imagine if the Keycloak pod goes down at some point, the operator will ensure that its brought back to the same state it was and where is that state going to be? in the CRs and the database.
Okay lets test this out further, how about adding a new realm via the KCImportRealmCR
Let’s go back to the Operator view
Click on KeycloakRealmImport -> Create instance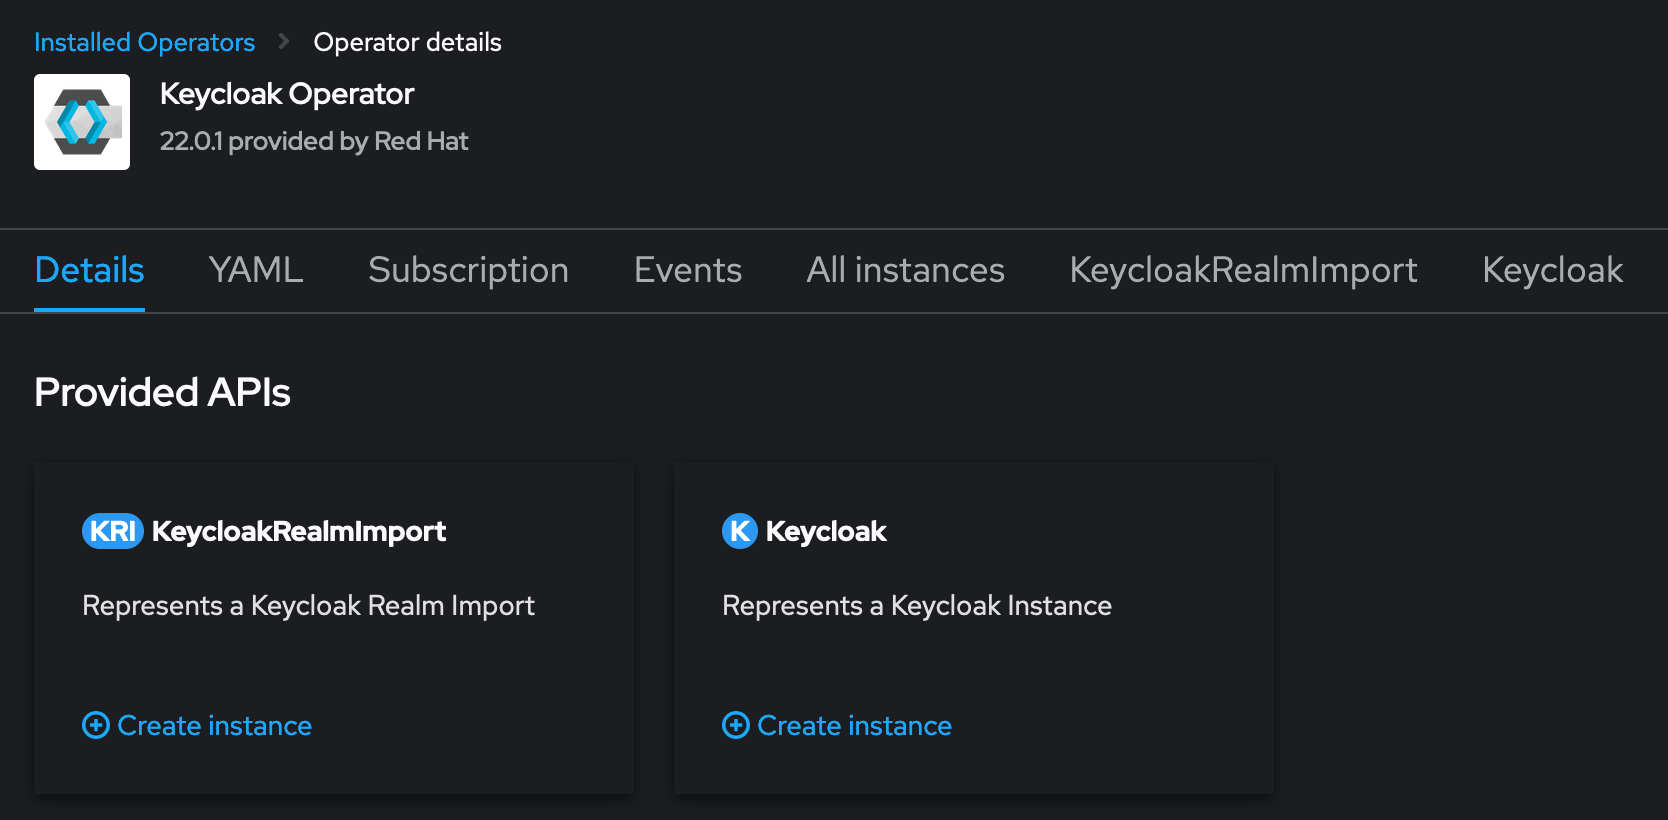
I had a realm json file. And obviously operators and most of the stuff in K8s expects yaml so I had to make a conversion. I used the following yq for conversion. There are also online tools available, but given the sensitive nature of realms I wouldnt suggest using a random online tool to convert to yaml.
So here is the resultant CR
Load the yaml and press create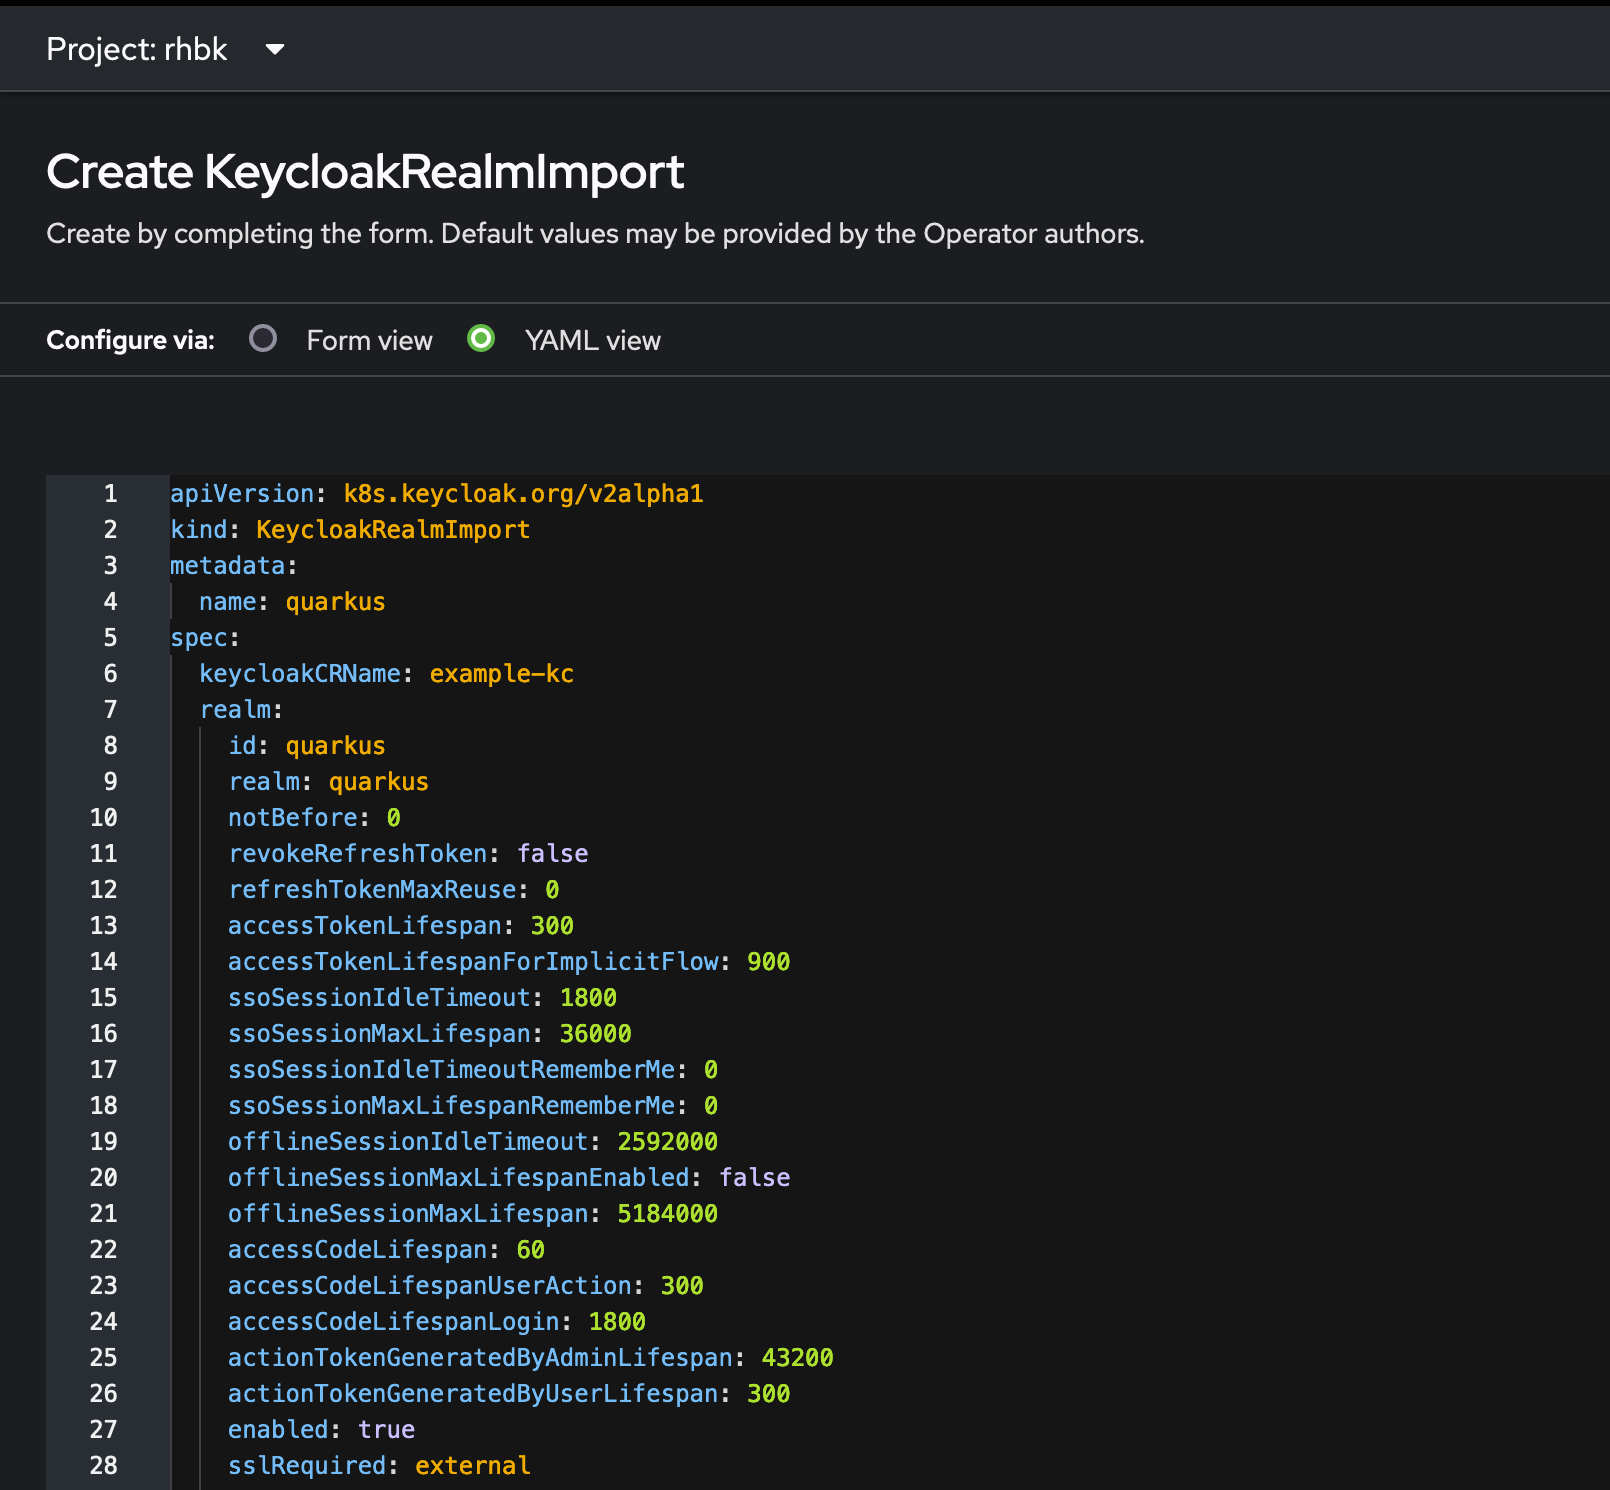
It can take a couple of seconds to that it will come up. As soon as we create the CR, the Keycloak Operator will pick it up and add it to the running Keycloak instance. If you log back into the admin console it should look like this.
And if we explore further and look into the clients there is a backend-service. Its a Client config for a Quarkus based REST service written in Java. Thats for another post. There is alot more that can be done with Operators.
If you are looking for more in depth details the Keycloak docs is a great resource. If you are looking to explore more and try this installation you can also use the following Keycloak tutorial
More to come on Keycloak in later posts.