
Advanced config
In this excercise lets try some of the cusomtizations Red Hat SSO has to offer.
Keys and Signing
Custom Code
OTP Tokens
Themes
Keys and Signing
By default Red Hat SSO signs tokens with RS256, but we have support for other signing algorithms. We also have support for a single realm to have multiple keys.
It’s even possible to change signing algorithms and signing keys transparently without any impact to users. This is a powerful feature since over time, applications can change the way they authinticate.
Let’s first try to change the signing algorithm for the JS console client.
First let’s see what algorithm is currently in use.
1. Open the JS Console, login,
2. then click on ID Token.
3. This will display a rather cryptic string, which is the encoded token.
4. Copy this value, making sure you select everything.
In a different tab open the JWT validation extension.
What we’re interested is in the header. The field alg will show what signing algorithm is used to sign the token. It should show RS256.
Great so that gives us details of the current token in use.
Now let’s change this to this to something new, maybe ES256.
1. Open the Red Hat SSO Admin Console in a new tab.
2. Ensure you keep the JS Console open as we want to show how it gets new tokens without having to re-login.
3. Click on Clients and select the js-console client.
4. Under Fine Grained OpenID Connect Configuration switch Access Token Signature Algorithm and ID Token Signature Algorithm to ES256.
5. Now go back to the JS Console and click on Refresh. This will use the Refresh Token to obtain new updated ID and Access tokens.
6. Click on ID Token, copy it and open the JWT validation extension again. Notice that now the tokens are signed with ES256 instead of RS256.
While you’re looking at the ID Token take a note of the kid, try to remember the first few characters. The kid refers to the keypair used to sign the token.
1. Go back to the Red Hat SSO Admin Console.
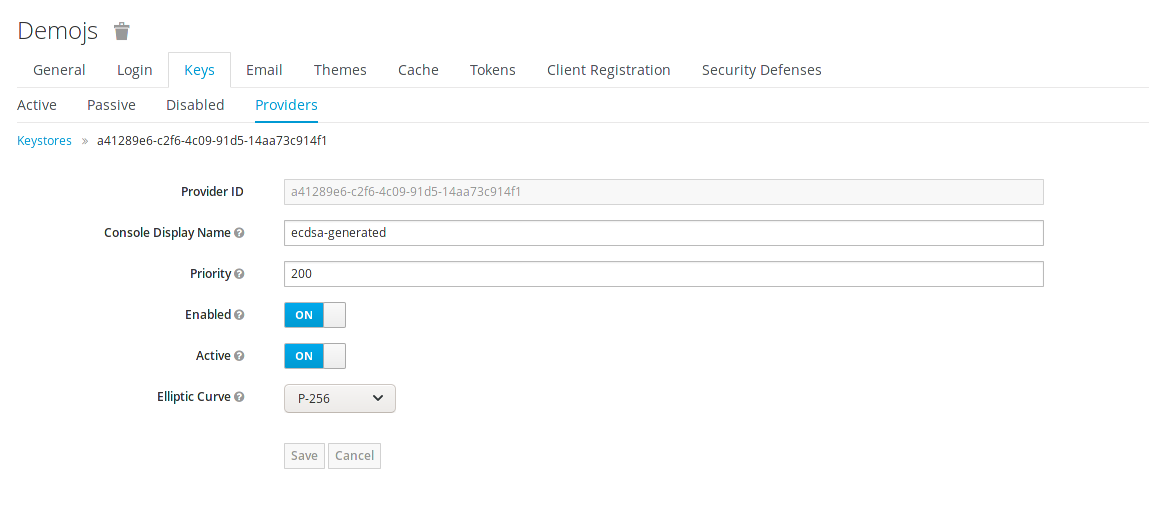
2. Go to Realm Settings then Keys. What we’re going to do now is introduce a new set of active keys and mark the previous keys as no longer the active keys.
3. Click on Providers.
4. From the drop-down select ecdsa-generated.
5. Set the priority to 200 and click Save. As the priority is higher than the current active keys the new keys will be used next time tokens are signed.
Now go back to the JS Console and clik on Refresh. Copy the token to the JWT validation extension. Notice that the kid has now changed.
What this does is provide a seamless way of changing signatures and keys. Currently logged-in users will receive new tokens and cookies over time and after a while you can safely remove the old keys without affecting any logged-in users.
Sessions
Make sure you have the JS Console open in a tab and you’re logged-in. Open the Red Hat SSO Admin Console in another tab.
Find the user you are logged-in as and click on Sessions. Click on Logout all session.
Go back to the JS Console and click Refresh. Notice how you are now longer authenticated.
Not only can admins log out users, but users themselves can logout other sessions from the account management console. You can go to the following link to access your account. SERVER_URL/auth/realms/demojs/account
Events
Events are the system wide events, you can see each event regarding the events, e.g. is someone tried to login with wrong credentials and alot more. These details are important e.g. auditing or compliance usecases as well.
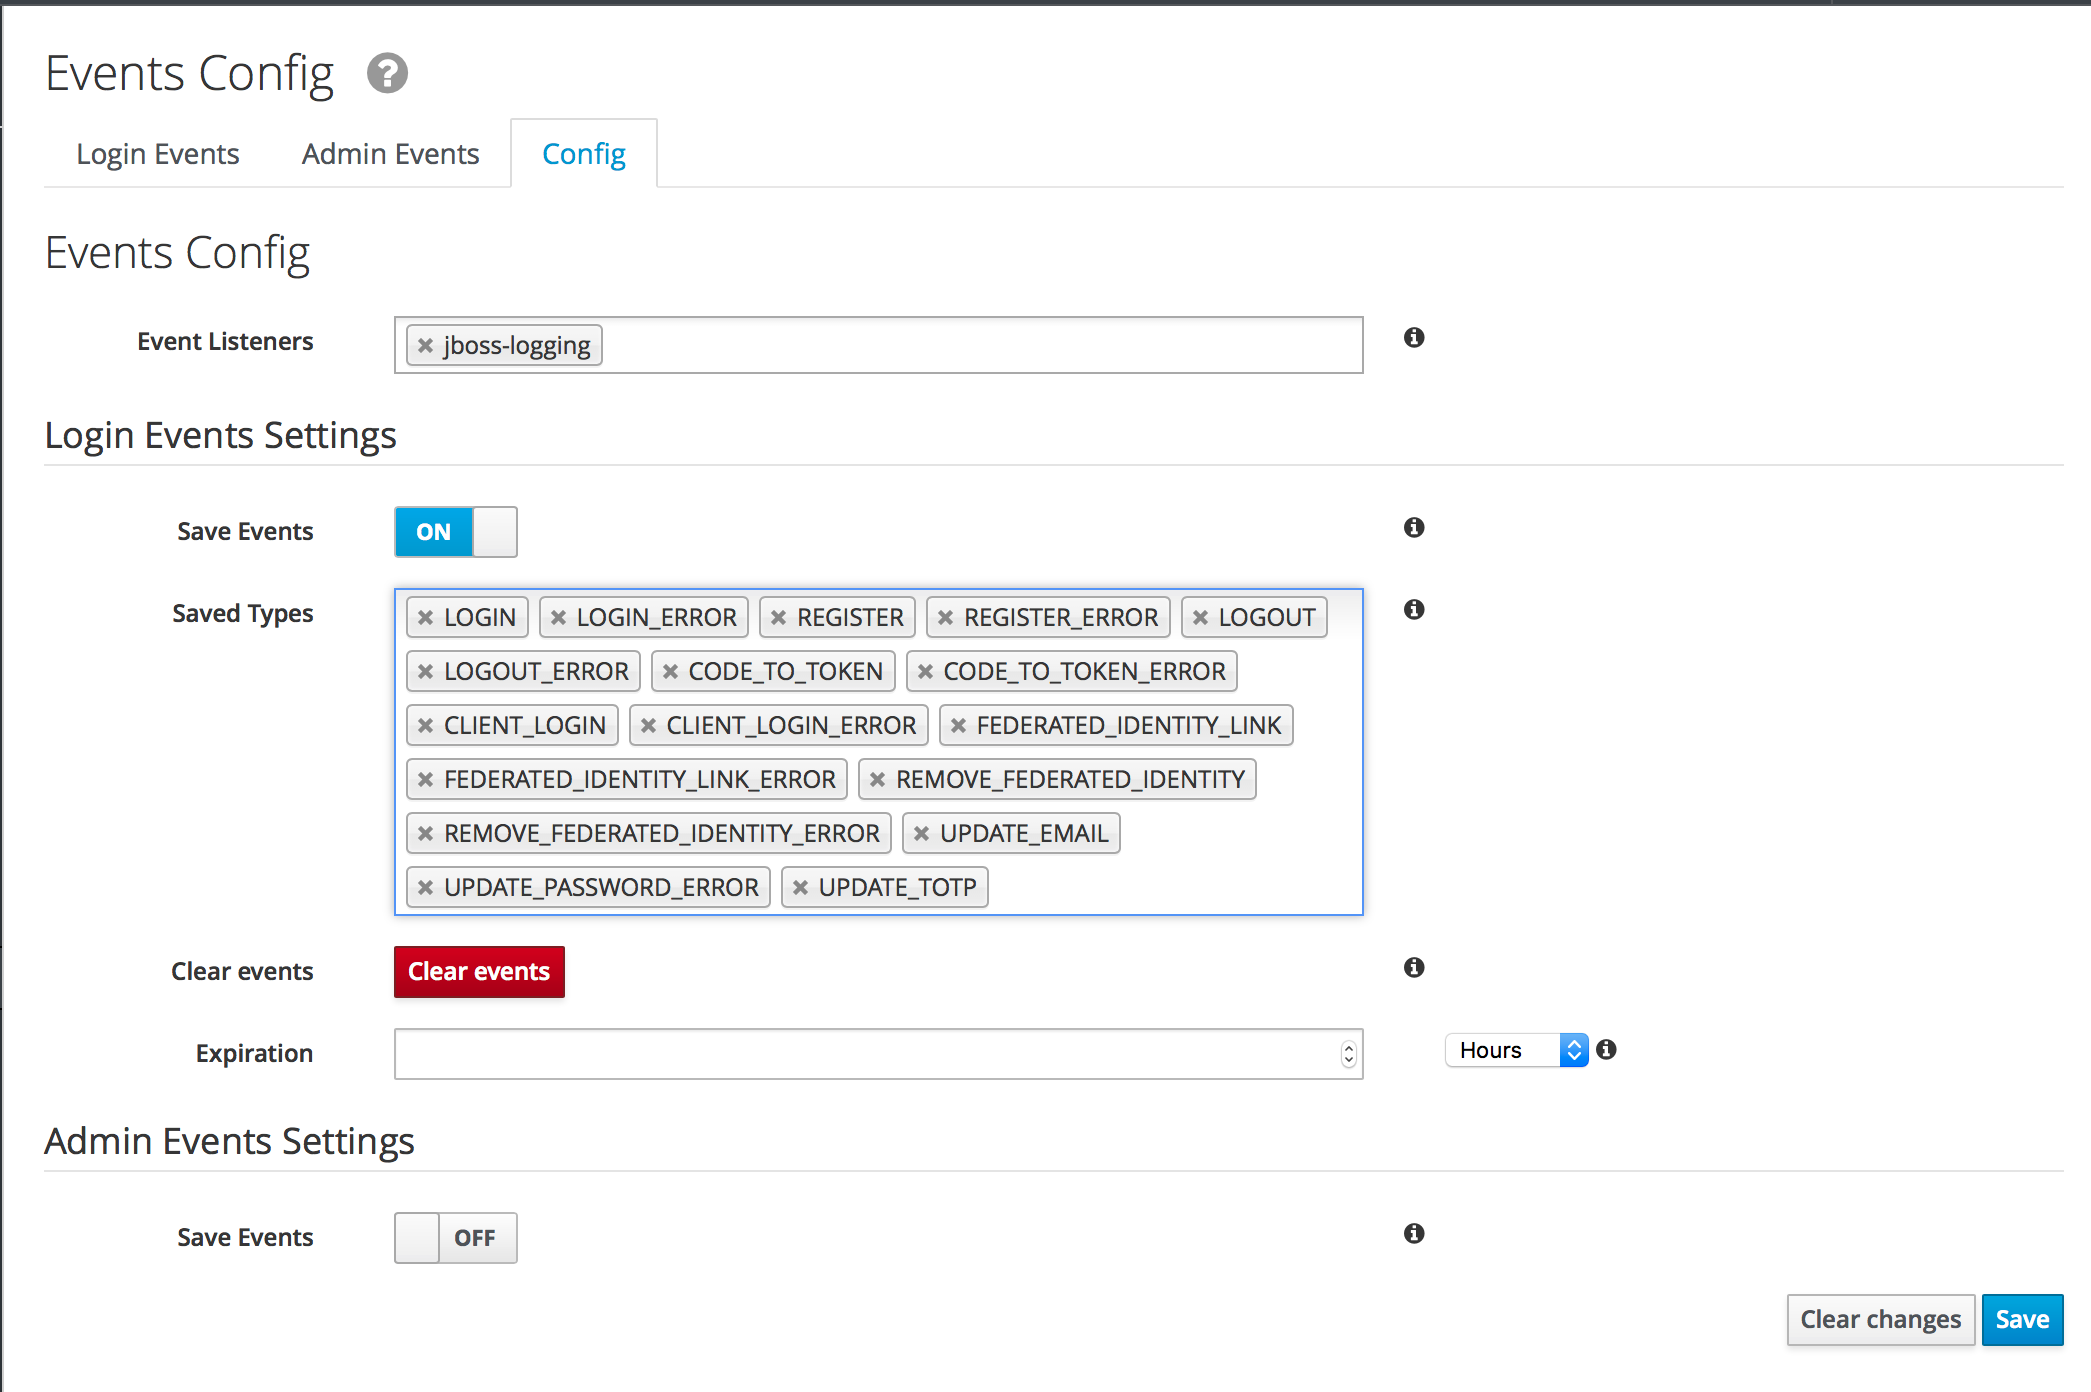
1. Open the Red Hat SSO Admin Console.
2. Click on Events and Config.
3. Turn on Save Events and click Save.
4. Go back to the JS Console and click Refresh.
5. Logout.
6. Then when you log in use the wrong password, then login with the correct password.
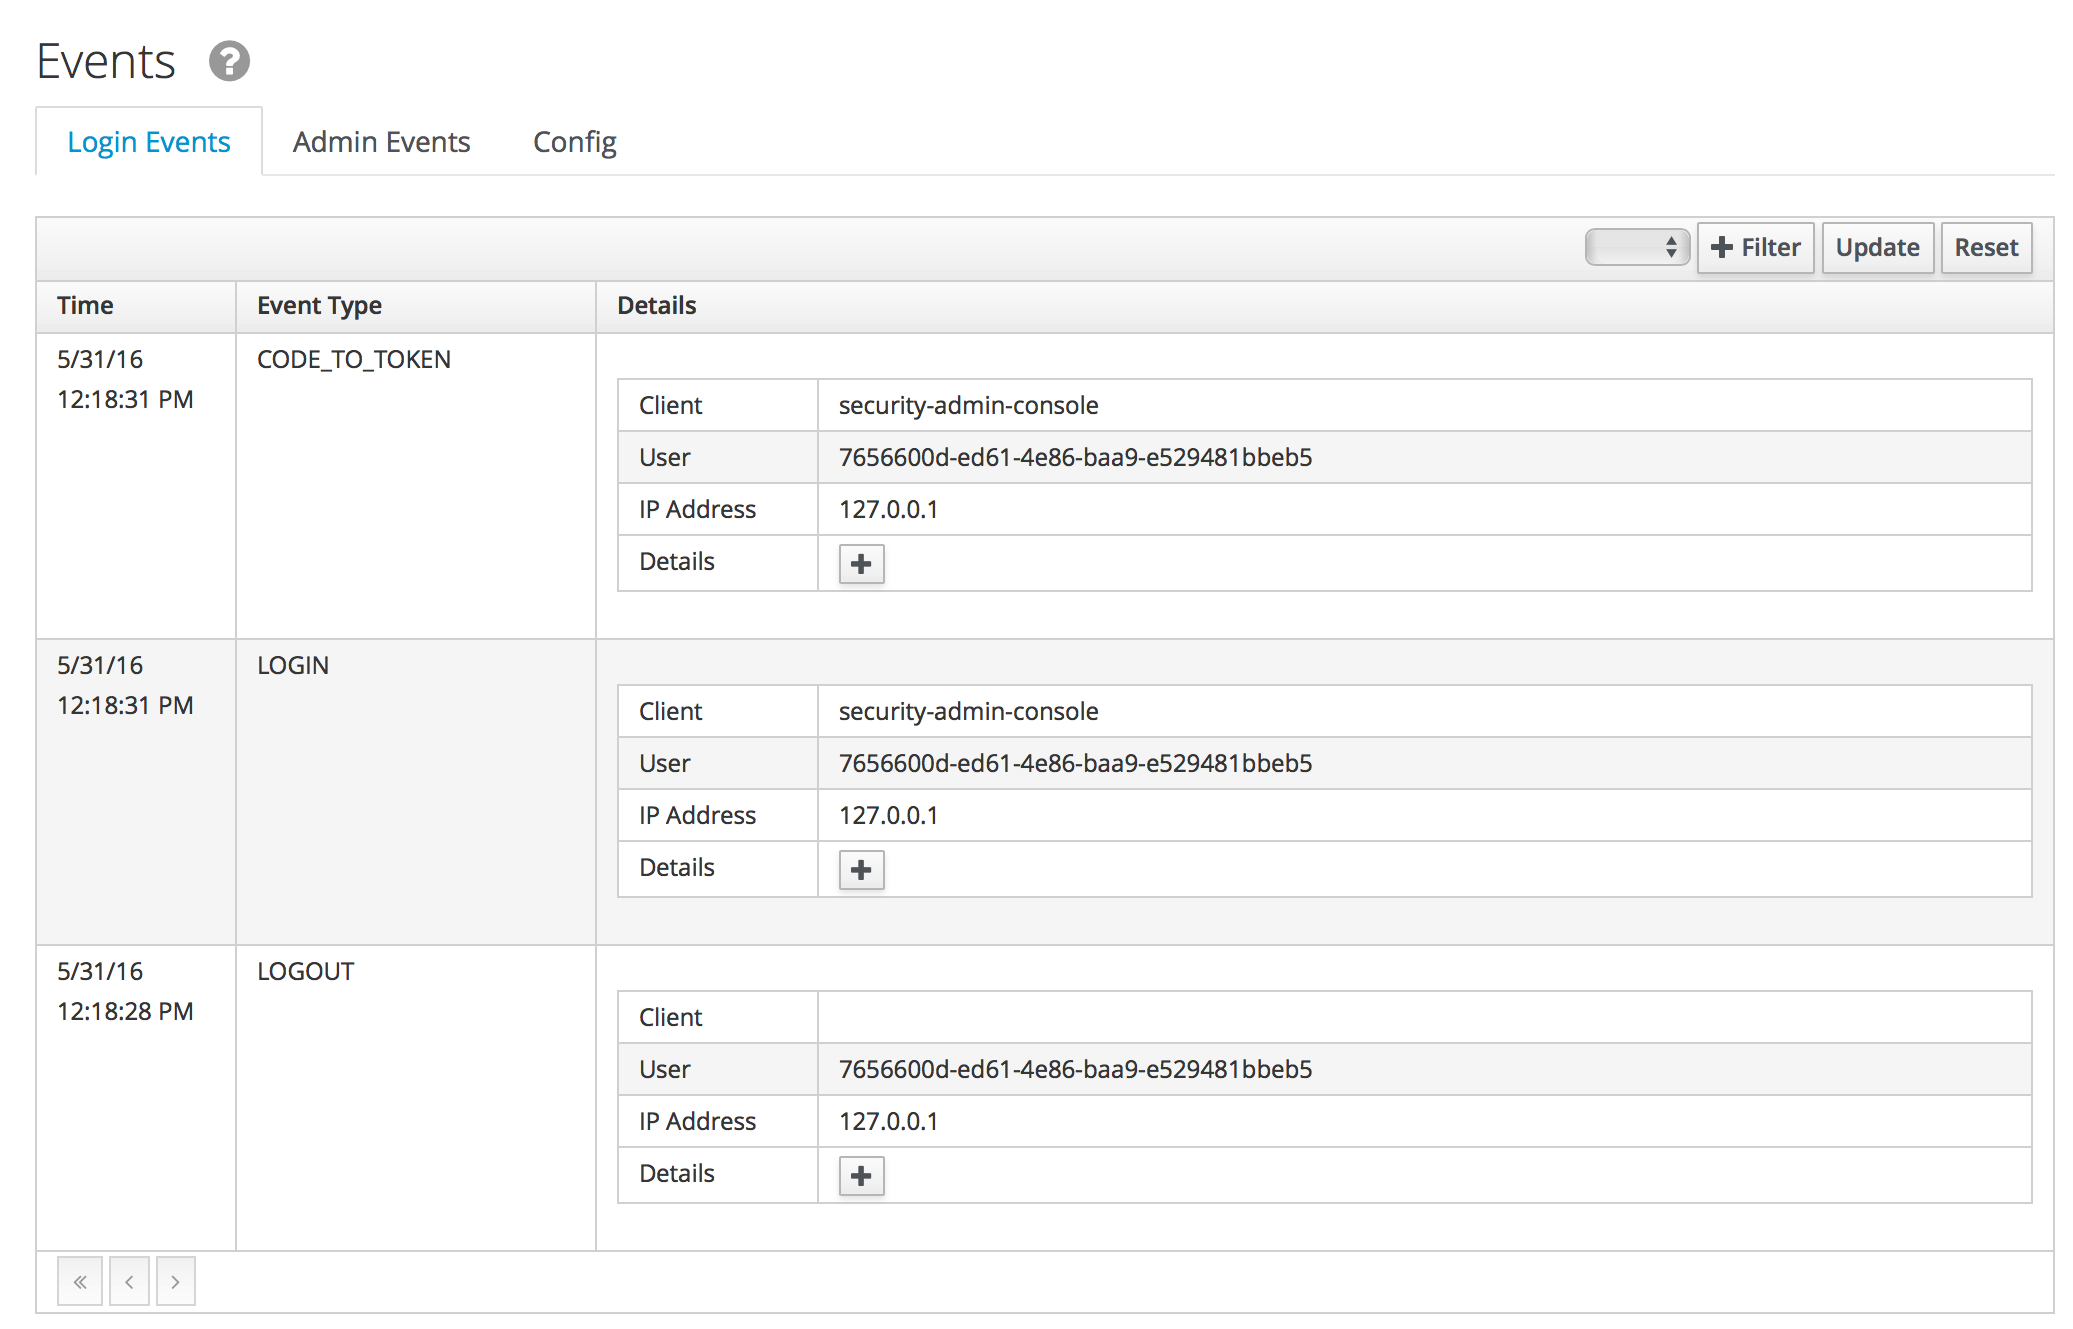
Go back to the Events in the Red Hat SSO Admin Console and notice how there are now a list of events.
Not only can Red Hat SSO save these events to be able to display them in the admin console and account management console, but you can develop your own event listener that can do what you want with the events.
Custom Code and Flows
Red Hat SSO has a huge number of SPIs that allow you to develop your own custom providers. You can develop custom user stores, protocol mappers, authenticators, event listeners and a large number of other things. We have about 100 SPIs so you can customize a lot!
Creating and Adding custom code to RH-SSO Stream
We already have created some custom code for you to make use of.
Magic Link is an application that creates a magic link for the emails sent to users.
Themes is also a custom theme for the system.
Lets build the two projects. Goto your code ready terminal and navigate to these projects. Ensure you are in the root directory e.g. sso-kubernetes-workshop.
#build individual projects
cd magic-link
mvn clean compile package

cd ../themes
mvn clean compile package

# copy the jar files
cd ../sso-custom/stream
cp ../../magic-link/target/magic-link.jar deployments/
cp ../../themes/target/themes.jar deployments/
So we have now built the jar files and copied them to our working directory from where we will build our custom RH-SSO image. You can always create the images in an openshift namespace, so that all users and applications have access to it. In our case we have chosen to keep this to our project namespace only.
Remember to replace evalsXX with your username and also ensure you are in the sso-custom/stream directory before running the following commands.
# Create a new project
oc new-project <evalsXX>-sso-custom-kubernetes-workshop

# Create a build directive with Red Hat SSO official image stream.
oc new-build --name custom-sso73-openshift --binary --strategy source --image-stream redhat-sso73-openshift:1.0

# Start the custom build
oc start-build custom-sso73-openshift --from-dir . --follow
Switch to this new project in your openshift console. the rest of the guide assumes the new SSO instance in this project.
You can now also run oc get imagestreams which should render a similar output as follows.
Notice that we have named our custom image as custom-sso73-openshift.
custom-sso73-openshift docker-registry.default.svc:5000/.../custom-sso73-openshiftNow that have the image ready to be deplyed we need to take one last step. Lets change the imageStream for the current SSO deployment. To do that, edit the Deployment Config of our deployed SSO. and change the image as follows and save.
This will trigger a kill of the current pod and deploy a new one with our imageStream. In the logs you should be able to see our deployed artifacts.
INFO [org.keycloak.subsystem.server.extension.KeycloakProviderDeploymentProcessor] (MSC service thread 1-2) Deploying Keycloak provider: themes.jar
INFO [org.keycloak.subsystem.server.extension.KeycloakProviderDeploymentProcessor] (MSC service thread 1-1) Deploying Keycloak provider: token-validation.jar
17:12:31,083 INFO [org.keycloak.subsystem.server.extension.KeycloakProviderDeploymentProcessor] (MSC service thread 1-1) Deploying Keycloak provider: magic-link.jar
Lets wait for it to be deployed successfully.
While openshift is deploying, lets also deploy our JS Console.
Now open the js-console/src/keycloak.json
Change the following line "auth-server-url" with your SERVER_URL
{
  "realm" : "demojs",
  "auth-server-url" : "SERVER_URL/auth",
  "resource" : "js-console"
}
Next open the js-console/src/index.html
And replace the SERVER_URL in the <header> <src>
For example:
<script src="https://sso-workshop.apps.cph-c747.open.redhat.com/auth/js/keycloak.js"></script>Before starting make sure that you have Code Ready workspace Terminal open.
- and also ensure that you have changed you directory too js-console/src
oc new-build --name js-console --binary --strategy source --image-stream httpdOk, so oc new-build should have set the right directives for our applicaiton. i.e. js-console which uses the httpd stream.
Lets start our build; in the following command we specify that our build will be from our local source dir.
oc start-build js-console --from-dir . --followOnce our build is successfull, lets create a new app with that build; this will be our js-console app.
oc new-app --image-stream=js-console:latestAnd finally expose a route for our service so that we can connect to it externally.
oc expose svc/js-consoleOnce openshift has finished deploying the JS console and Red Hat SSO custom built. Lets also create a client for the JS Console.
Click on the left menu bar item Clients
A list of clients will load.
Then Click the Create button
Following is the information you need to fill. To get the route to your js-console you can run the following command.
oc get route js-console1. We have used Master realm in this example, feel free create your own realm. Make sure that you have configured email as described in the earlier section on SSO Config. This needs to be done to get email for the magic link.
2. Also create a test user account for the realm.
3. Also fill in the details on the form (e.g. in below screenshot) and press save. Ensure you use protocol with your route e.g. 'http://js-console-evals01-custom-sso-kubernetes-workshop.apps.cph-5a34.open.redhat.com'(An example shown in the following screenshot)

Now go back to your browser and relaod the JS Console app. You should be redirected to the Login page
When we previously deployed Red Hat SSO we also included a custom authenticator that enables users to login through email. Its quite commmon that users of Red Hat SSO would need to change the default flows and configuration. What if the a user wanted to make a magic link to be sent to the ones that are registered. or what if they wanted to change the system themes. or add another flow. Red Hat SSO does that pretty nicely with the ability to add these custom flows to the realm. Lets get started and make a magic link flow.
The source code for the magic-link is placed in the magic-link/src, do take a look at the MagicLinkFromAuthenticator.java to see how we create the magic link. The API is quite straight forward.
1. To enable this open the Red Hat SSO Admin Console. Click on Authentication.
2. Click on Copy to create a new flow based on the browser flow.
3. Use the name browser-email. now select browser-email from the drop down list
4. Click on Actions and Delete for Username Password Form and OTP Form.
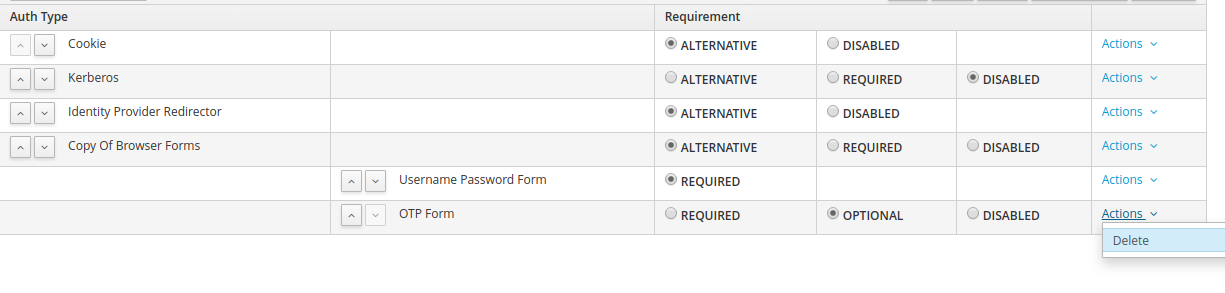
5. Then click on Add execution.
6. Select Magic Link from the list.
7. Once it’s saved select Required for the Magic Link.
8. Now to use this new flow when users login select Bindings and select browser-email for the Browser flow.
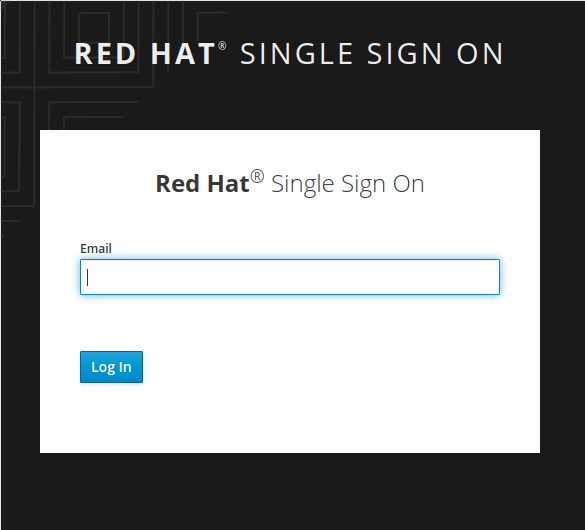
9. Open the JS Console and click Logout. For the email enter your email address and click Log In. Open your email and you should have a mail with a link which will authenticate you and bring you to the JS Console.
You should see the following screen, once you reload JS Console.
Congratulations! you have successfully done the following
1. Created a new Red Hat SSO image with custom code in it.
2. You have deployed a custom flow, that is different from the normal login flow
3. Lastly you have learnt how to create your own realm and configure your client for it.
Configuring OTP
— ADD OTP details and screenshot
1. Now let’s add OTP to the mix.
2. Open the Red Hat SSO Admin Console.
3. Go back to the Browser-email flow.
4. Click Actions and Add execution.
5. Select OTP Form. Then mark it as Required.
Open the JS Console and click Logout. Login again. After you’ve done the email based login you will be prompted to configure OTP. You’ll need Google Authenticator or FreeOTP on your phone to try this out.
Themes
We didnt cover details on the Themes in this section, but you should now be able to change the theme in the realm settings. The new theme is for the login page only and should be called sunrise. Try it out!
Achievement unlocked!
Congratulations in this section you have been able to customzie Red Hat SSO with Themes, OTP integration, changing keys, and adding custom code like the magic link. Now you are almost ready for the real world deployment. Lets head off to the next section where we will create our first Spring greeting service and secure it with Red Hat SSO.